Product Related
Questions
Can I get custom products? Can I purchase replacement electronic components? How to setup a Slip Joint Probe Holder How to setup a vertical probe holder How do I clean my scanner? WarrantyCan I get custom products?
Jireh’s policy on product customizations
JIREH’s standard product line is designed with modularity in mind. Many applications can be solved using existing JIREH products assembled in a new or unique configuration. Occasionally, the need arises for a complete custom product or part design and manufacturing. In these situations, non-refundable prepayment will be required before the custom parts are manufactured.
Can I purchase replacement electronic components?
JIREH's policy on electronic component replacement:
JIREH Industries strives to provide the best functioning, most reliable equipment in the inspection industry. Unfortunately, there are times when damage or component failure affects the proper operation of the equipment. Whenever possible, JIREH provides email and phone support to find solutions to keep the equipment operating correctly. Should we be unable to provide a solution remotely, JIREH requires that all equipment be returned to an approved repair facility to ensure that repairs are done carefully and accurately.
Why Must Systems Be Returned to an Approved Repair Facility?
Returning the equipment to an approved repair facility is required for many reasons:
-
Maintaining the integrity of the equipment’s regulatory compliance, safety and reliability.
-
Ensuring these carefully manufactured and tested products comply with various international regulations.
-
Confirm all JIREH products undergo a safety analysis with specialized procedures and QC tests which are put in place to ensure the safety of our systems, which is a part of the design and regulatory cycle.
While failures occasionally occur, equipment reliability is of the utmost importance to us. As such, proper repair requires:
-
Knowledge of equipment functions and performance specifications and proprietary information
-
Specialized equipment
-
Understanding of complex repair techniques and intricate assembly
-
Ability and equipment to test products
Proper repairs to factory specifications often cannot be performed at other facilities. History has shown that misdiagnosis or further repair damage caused by unapproved repair facilities is highly likely even when the repair facility may appear to have suitable expertise.
Extenuating Circumstances
JIREH does recognize that in some situations, equipment owners may need to attempt their own repairs. JIREH may provide components for repair outside of JIREH-approved facilities in some instances. Should this occur, several factors are essential to be aware of:
Responsibility for Equipment After Repair
The person or company completing the repair assumes all responsibility for the equipment’s regulatory, safety performance, and reliability after the repair.
Effect on Standard Warranty
Disassembly or opening of equipment for field repairs voids the factory warranty. At JIREH’s discretion, the original equipment warranty may be restored by returning the equipment to an approved repair facility, where it can be evaluated and inspected.
Part Costs
Parts for a repair typically need to be purchased. In rare cases, some mechanical components may be supplied under warranty. It is highly unusual to provide electronic components under warranty as it is often difficult to provide proof of diagnosis or component failure.
Supplied Component Warranty
In specialized circumstances where electronic components are available for purchase, the components supplied are non-returnable and have no warranty.
-
Even simple handling issues easily damage electronic components.
-
Diagnosis is often not correct or complete, and this may cause incomplete repair or even immediate failure of supplied components.
-
Often the expertise or equipment available to repair the equipment does not meet our standards or requirements for quality repairs. Frequently field repairs cause secondary issues. The warranty will be void as we cannot guarantee the quality of the repair.
Component Replacement Instructions
Instructions for replacement components cannot be provided as this type of repair is not supported. The customer is relying on the expertise of the unapproved facility to complete the repairs.
Advantages to having repairs done at an Approved Repair Facility
There are many advantages to having repairs completed at JIREH-approved repair facilities.
-
Repairs will return the equipment to the best possible working condition.
-
The techniques used to repair equipment will be the same techniques used to manufacture the equipment, resulting in the regulatory approvals, safety, and reliability of the equipment being maintained or restored.
-
Products with a recall notice will be discovered and have necessary changes/updates performed at no charge.
-
In many situations, if upgrades are available, they are often applied at no cost to the customer, even when the standard warranties have expired. There is no better way to have JIREH equipment serviced than having JIREH experts complete the repairs.
Warranty
JIREH has one of the best warranties in the industry. Details on the warranty can be found here.
To send equipment to JIREH for repair, please fill out an RMA request.
Example of Un-approved Repair at Unauthorized Repair Centre
This repair was done at an unauthorized electronics repair facility. The repair caused multiple failures in addition to the initial problem. In the attempted repairs, components were tampered with that were not related to the initial failure point.
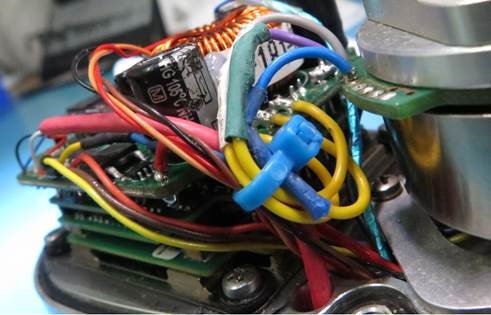
(Note the unnecessary splicing, excessive solder, melting on the capacitor, damage from excessive heat and solder shorting.)
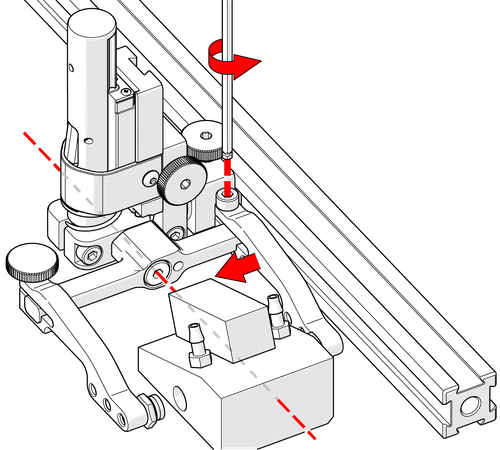
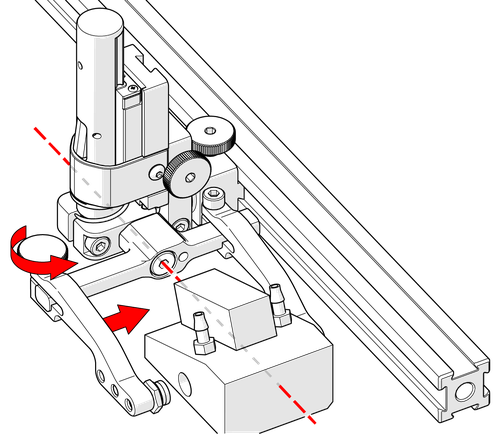
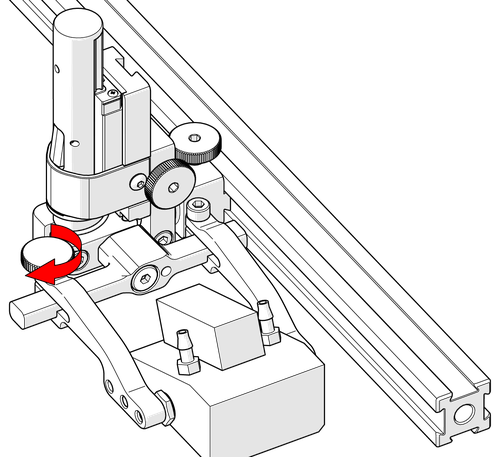
How to setup a Slip Joint Probe Holder
Learn to position, adjust and set up a slip joint probe holder to carry probes and wedges:
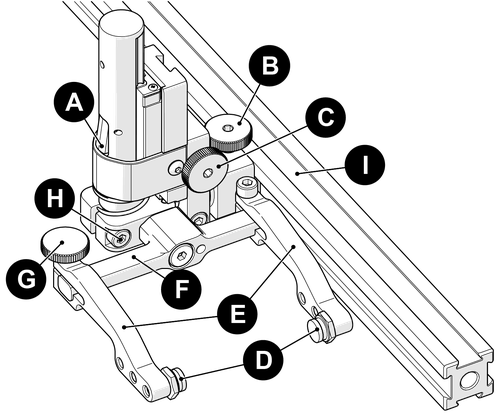
Slip Joint Probe Holder, Identification
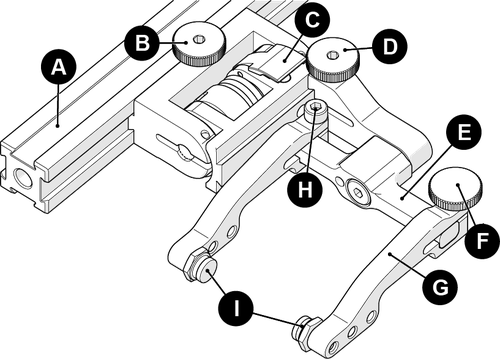
A Frame Bar
B Probe Holder Adjustment Knob
C Latch
D Swing Arm Knob
E Yoke
F Probe Holder Arm Adjustment Knob
G Probe Holder Arm
H Arm Clamp Screw
I Pivot Buttons
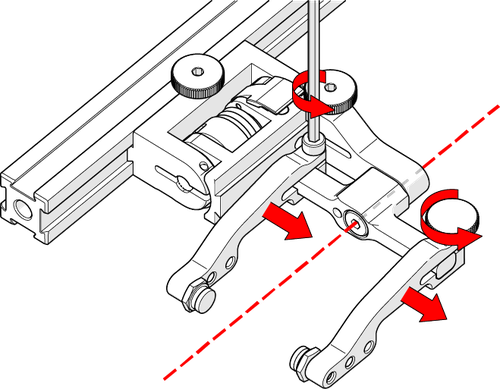
Probe Holder Setup
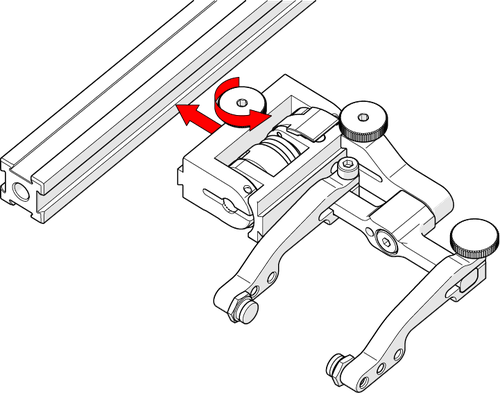
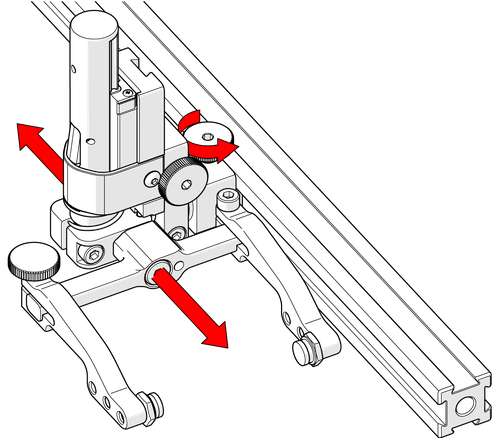
Rotate the probe holder adjustment knob and attach the probe holder to a frame bar.
Use the probe holder adjustment knob to position the probe holder along the frame bar.
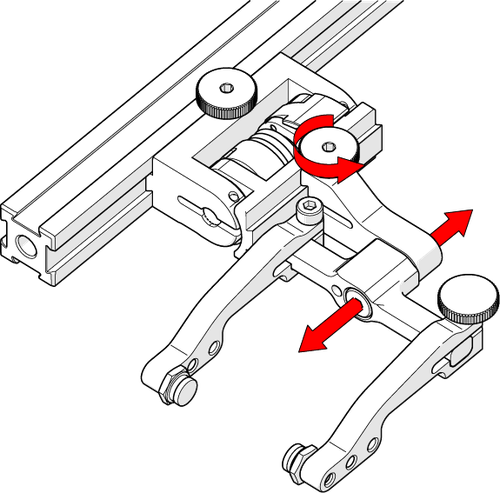
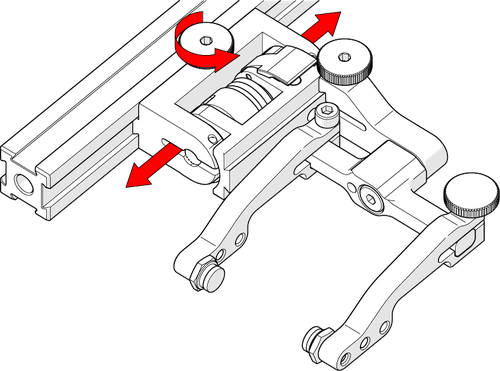
Use the swing arm knob to position the swing arm.
Tip: The swing arm is typically used to adjust TOFD center to centre distance relative to the phased array probes on a four probe configuration.
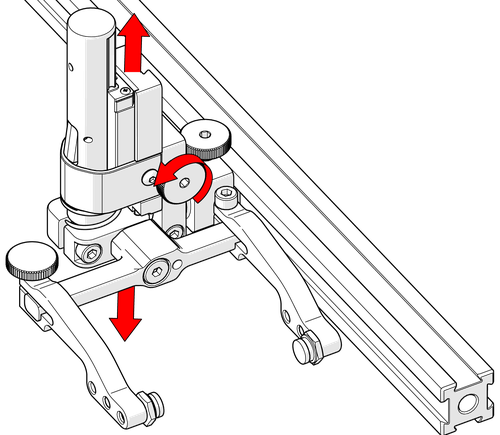
Using a 3/8 in wrench (supplied with any JIREH scanner kit), place the pivot buttons farthest from the yoke for maximum wedge clearance.
Tip: If a narrow scanning footprint is required, use pivot button holes closest to the yoke. Wedge pivoting may be impeded when closer to the yoke.
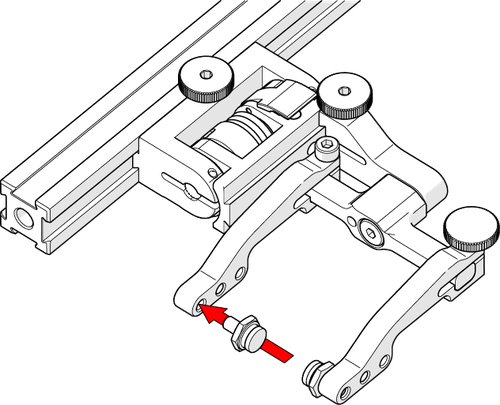
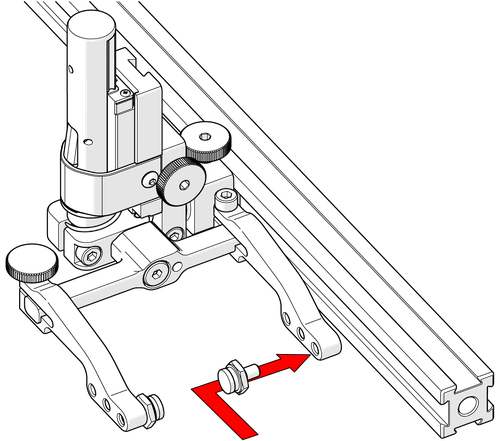
Loosen the probe holder arm adjustment knob and remove the outer probe holder arm from the yoke.
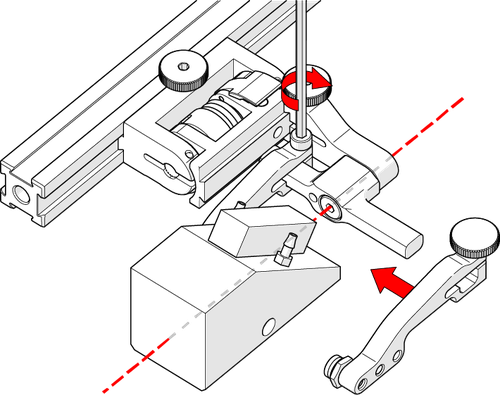
Adjust the inner probe holder arm as required to best centre the probe on the yoke’s pivot axis.
Tip: The probe holder yoke can accommodate many different probe and wedge sizes of varying widths. It is best to centre the wedge with the yoke’s pivot axis to reduce wedge tipping when scanning. Position the inner probe holder arm accordingly with the centre of the yoke.
Position the wedge on the inner probe holder arm.
Slide outer probe holder arm along the yoke pinching the wedge in place.

Tighten probe holder arm adjustment knob.
How to setup a vertical probe holder
Learn to position, adjust and set up a vertical probe holder to carry probes and wedges
Vertical Probe Holder, Identification
A Latch
B Probe Holder Adjustment Knob
C Vertical Adjustment Knob
D Pivot Buttons
E Probe Holder Arms
F Yoke
G Probe Holder Arm Adjustment Knob
H Transverse Adjustment Screw
I Frame Bar
Probe Holder Setup
The probe holder adjustment knob allows the probe holder to be attached to a frame bar. Loosen the probe holder adjustment knob to enable horizontal positioning on a frame bar.
The vertical adjustment knob allows height adjustment of the vertical probe holder.
Depending on the type of probe holder arms, various positions for the pivot buttons may exist. Use a 3/8 in wrench (a 3/8 in wrench is included with all JIREH systems) to remove or install pivot buttons.
When a narrow scanning footprint is required, use the pivot button holes closet to the yoke.
TIP: Tip: Probe pivoting may be impeded when closer to the yoke.
Position the wedge on the inner probe holder arm.
Tip: The probe holder yoke can accommodate many different probe and wedge sizes of varying widths. It is best to centre the wedge with the yoke’s pivot axis. This can reduce wedge ‘rocking’ when scanning. Position the inner probe holder arm accordingly using the supplied 3 mm hex driver.
Loosen the probe holder arm adjustment knob and slide the probe holder arm along the yoke pinching the wedge in place. Use care to ensure the centre of the probe is aligned with the centre of the yoke.
Tighten the probe holder arm adjustment knob.
How do I clean my scanner?
Proper scanner maintenance
General cleaning of components is important to keep your system working well. All components that have no wiring or cables are completely waterproof. Components can be washed with warm water, dish soap and a medium bristle brush.
Before using the scanner, ensure all connectors are free of water and moisture.
NOTE: All components with wiring, cables or electrical connections are splashproof. However, these components are NOT submersible.
NOTE: Never use strong solvents or abrasive materials to clean your scanner components.
See the instructions below for cleaning specific scanner types.
![]()
After washing your ROTIX system, use a light oil to lubricate the slide and the adjustment screw on the buckle component.

![]()
Before every use, the NAVIC system must be maintained and inspected.
Inspection of safety apparatus: (this includes)
-
All components of the tether system. Replace damaged components as necessary.
-
Lifting sling on the crawler. If the lifting sling shows signs of damage (e.g. cuts, abrasion, etc) do NOT use.
Clean the drive wheels:
-
Debris will collect on the magnetic wheels. Remove this debris before every use. An effective cleaning method uses adhesive-backed tape (e.g. duct tape) to ‘pull’ the debris off the wheels.
Inspect cables and connectors
-
Inspect the umbilical cable, the controller cable and the power cable for damage. Have any damaged cable repaired by a qualified person or replace the cable assembly as necessary.
-
Inspect all connectors for damage or moisture. Straighten bent pins. Dry connectors before using.
General cleaning
-
Ensure that the scanner stays relatively clean by wiping off any excess dirt or other contaminants after every use.
![]()
Before every use, the SKOOT system must be maintained and inspected.
Inspection of safety apparatus: (this includes)
-
All components of the tether system. Replace damaged components as necessary.
-
Lifting sling on the crawler. If the lifting sling shows signs of damage (e.g. cuts, abrasion, etc) do NOT use.
Clean the drive wheels:
-
Debris will collect on the magnetic wheels. Remove this debris before every use. An effective cleaning method uses adhesive-backed tape (e.g. duct tape) to ‘pull’ the debris off the wheels.
Inspect cables and connectors
-
Inspect the umbilical cable, the controller cable and the power cable for damage. Have any damaged cable repaired by a qualified person or replace the cable assembly as necessary.
-
Inspect all connectors for damage or moisture. Straighten bent pins. Dry connectors before using.
General cleaning
-
Ensure that the scanner stays relatively clean by wiping off any excess dirt or other contaminants after every use.
Warranty
Learn the details of JIREH's Warranty Policy
WARRANTY COVERAGE
Jireh Industries warranty obligations are limited to the terms set forth below: Jireh Industries Ltd. (“Jireh”) warrants this hardware product against defects in materials and workmanship for a period of THREE (3) YEARS from the original date of purchase. If a defect exists, at its option Jireh will (1) repair the product at no charge, using new or refurbished replacement parts, (2) exchange the product with a product that is new or which has been manufactured from new or serviceable used parts and is at least functionally equivalent to the original product, or (3) refund the purchase price of the product. A replacement product/part assumes the remaining warranty of the original product or ninety (90) days from the date of replacement or repair, whichever provides longer coverage for you. When a product or part is exchanged, any replacement item becomes your property and the replaced item becomes Jireh’s property. When a refund is given, your product becomes Jireh’s property.
OBTAINING WARRANTY SERVICE
To utilize Jireh’s warranty service you must ship the product, at your expense, to and from Jireh Industries. Before sending a product for warranty service, an RMA number must be obtained. RMA numbers can be obtained by filling out the RMA Request Form. This number will be used to process and track your product. Jireh is not responsible for any damage incurred during transit.
EXCLUSIONS AND LIMITATIONS
This Limited Warranty applies only to hardware products manufactured by or for Jireh Industries. This warranty does not apply: (a) to damage caused by accident, abuse, misuse, misapplication, or non-Jireh products; (b) to damage caused by service (including upgrades and expansions) performed by anyone who is not a Jireh Authorized Service Provider; (c) to a product or a part that has been modified without the written permission of Jireh.
Three-year warranty is valid on all products sold after October 31, 2013